Getting Started
This page covers the core concepts required to make your first query or mutation.
Sections included in this article:
Overview
ShipHero’s public API lives in https://public-api.shiphero.com, and there are two main endpoints:
https://public-api.shiphero.com/auth(used for getting tokens)https://public-api.shiphero.com/graphql(used for fetching and modifying your data)
In order to make requests, you will first need to get a token that validates your identity. You get a token by authenticating with your user credentials. Once you have it, every request made to the API has to include it as part of the Authorization header as Bearer <your token>.
Note
API keys are not required for the public API. Authenticate with user credentials to obtain a token. If you need a dedicated public API user, create one and use that account to generate tokens.
Authentication
Authenticated requests are made with a JWT bearer token. To generate them you will have to provide your user credentials:
curl -X POST -H "Content-Type: application/json" -d
'{ "username": "YOUR EMAIL",
   "password": "YOUR PASSWORD"
}'
"https://public-api.shiphero.com/auth/token"
The response should look something like this:
{ "access_token": "eyJ0eXAiOiJKV1QiLCJhbGciOiJSUzI1NiIsImtpZCI6IlJUQXlOVU13T0R
rd09ETXhSVVZDUXpBNU5rSkVOVVUxUmtNeU1URTRNMEkzTWpnd05ERkdNdyJ9.aktgc3MiOiJodHRwc
zovL3NoaXBoZXJvLmF1dGgwLmNvbS8iLCJzdWIiOiJhdXRoMHw1YmI3YTI4MjY4YTU2YzRjNTEzMTIx
MWIiLCJhdWQiOiJzaGlwaGVyby1wdWJsaWMtYXBpIiwiaWF0IjoxNTU0OTEwODc0LCJleHAiOjE1NTc
zMzAwNzQsImF6cCI6Im10Y2J3cUkycjYxM0RjT04zOAMRYUhMcVF6UTRka2huIiwic2NvcGUiOiJlbW
FpbCBwcm9maWxlIG9mZmxpbmVfYWNjZXNzIiwiZ3R5IjoicGFzc3dvcmQifQ.lW2UalihR5msHKhJzD
Pvy5SCKxSPyUCMuQ7RXyP2ZNQ2gENjGF2nmdsYlF2CqxH_wITcK10CproQErMK_yAWUSEck8qfC1Fu_
UNc9-xW55ALeCk09ZZD--aB_QFjLVM-ooawby7y4Ysf8H4yEBQpoPwZoQ3DQnu5QBNxd5oOLIP2ezzN
Yvrwjpm-uNN8II5sK9U075Mx1HH31KG14iFt5sEZQmYOz-oSWweVuY6Sd61VFD02sncXOmEZIxu3bda
ZSn1JYaM-ilLce4s748iv75BVDgqj1b2A1lyITeqvFoYWl3PKV56fOlfm8v9QnkSqR0iTGENgV6zZq3
rPRsBLTw", "expires_in": 2419200, "refresh_token": "cBWV3BROyQn_TMxETqr7ALQBaoF
gIzkC-8KkJaIq2HmK_", "scope": "openid profile offline_access",
"token_type": "Bearer" }
Store the access_token and refresh_token. Use the access token as the bearer token for requests to the GraphQL API.
The access token expires every 28 days. You can refresh it with the refresh token without re-entering credentials. Store refresh tokens securely because anyone with one can generate new access tokens for your account.
To refresh a token:
curl -X POST -H "Content-Type: application/json" -d
'{ "refresh_token": "YOUR REFRESH TOKEN" }'
"https://public-api.shiphero.com/auth/refresh"
The response should look something like this:
{ "access_token": "eyJ0eXAiOiJKV1QiLCJhbGciOiJSUzI1NiIsImtpZCI6IlJUQXlOVU13T0Rrd
09ETXhSVVZDUXpBNU5rSkVOVVUxUmtNeU1URTRNMEkzTWpnd05ERkdNdyJ9.aktgc3MiOiJodHRwczov
L3NoaXBoZXJvLmF1dGgwLmNvbS8iLCJzdWIiOiJhdXRoMHw1YmI3YTI4MjY4YTU2YzRjNTEzMTIxMWIi
LCJhdWQiOiJzaGlwaGVyby1wdWJsaWMtYXBpIiwiaWF0IjoxNTU0OTEwODc0LCJleHAiOjE1NTczMzAw
NzQsImF6cCI6Im10Y2J3cUkycjYxM0RjT04zOAMRYUhMcVF6UTRka2huIiwic2NvcGUiOiJlbWFpbCBw
cm9maWxlIG9mZmxpbmVfYWNjZXNzIiwiZ3R5IjoicGFzc3dvcmQifQ.lW2UalihR5msHKhJzDPvy5SCK
xSPyUCMuQ7RXyP2ZNQ2gENjGF2nmdsYlF2CqxH_wITcK10CproQErMK_yAWUSEck8qfC1Fu_UNc9-xW5
5ALeCk09ZZD--aB_QFjLVM-ooawby7y4Ysf8H4yEBQpoPwZoQ3DQnu5QBNxd5oOLIP2ezzNYvrwjpm-u
NN8II5sK9U075Mx1HH31KG14iFt5sEZQmYOz-oSWweVuY6Sd61VFD02sncXOmEZIxu3bdaZSn1JYaM-i
lLce4s748iv75BVDgqj1b2A1lyITeqvFoYWl3PKV56fOlfm8v9QnkSqR0iTGENgV6zZq3rPRsBLTw",
"expires_in": 2419200, "scope": "openid profile offline_access", "token_type":
"Bearer" }
Replace the previous access_token with the new one for subsequent API requests.
Adding a Third-Party Developer
For third-party developers, asking a client to share their ShipHero username and password is neither ideal nor secure.
Instead, create a third-party developer user and provide that user with the Bearer Token and Refresh Token.
To do this, go to https://app.shiphero.com/dashboard/users and click +Add Third-Party Developer.
After the developer is added, the Bearer Token and Refresh Token will be available. Provide those tokens to the developer:
Note
Always communicate secrets in a secure way.
Schema & Docs
The API is built with GraphQL.
GraphQL is self-documenting, so you can inspect the schema, queries, mutations, and types to see what is available, which parameters each operation accepts, and what each response returns.
You can browse a schema extract here. It is updated with every API release.
You can also use a client IDE to send requests and explore the schema. Common options include:
Note
Prefer the desktop versions or browser extensions of these clients. Web versions often have connection issues.
Using your token and pointing your client to https://public-api.shiphero.com/graphql, you can access both the schema and the docs.
For example, in GraphQL Playground or Altair:
Note
You do not need to run a query to access the schema and docs.
Queries & Mutations
The API exposes both queries and mutations, and every operation returns an object. Although GraphQL operations can return fields, lists, or connection fields, ShipHero wraps every operation in a BaseResponse. This allows response metadata to be included without adding those fields to resource types.
Queries
Queries support two additional parameters: sort and analyze.
sortapplies to queries that return multiple results through connection fields. Pass a comma-separated list of attributes to sort by. Sorting is ascending by default, and each field can be prefixed with+or-. Example:sort: "name, -price"analyzeis a boolean flag that calculates query complexity without executing the query. For more information, see Throttling & Quotas.
The BaseResponse object returned on every query will always have the following fields:
request_id:A unique request identifiercomplexity:The complexity of the querydata:The actual results of the query (a Field, List or Connection Field)
Every connection field accepts standard Relay pagination parameters. If first and last are omitted, the default maximum of 100 is applied. Requesting more results increases query complexity and consumes more quota credits.
Example getting all products
query {
    products {
        complexity
        request_id
        data(first: 10) {
            edges {
                node {
                    id
                    sku
                    name
                    warehouse_products {
                        id
                        warehouse_id
                        on_hand
                    }
                }
            }
        }
    }
}
Example getting a product by SKU
query {
    product(sku: "some-sku") {
        complexity
        request_id
        data{
            id
            sku
            name
            warehouse_products {
                id
                warehouse_id
                on_hand
            }
        }
    }
}
Mutations
For mutations, the same rules apply, but in this case, the result is not called data, it’s defined on each mutation, so usually if you create a product, you will have a product field in the response.
Example creating a product
mutation {
    product_create(data: {
        name: "New Product"
        sku: "P0001"
        price: "10.00"
        value: "2.00"
        barcode: "000001"
        warehouse_products: [
            { warehouse_id: "V2FyZWhvdXNlOjExNA==" on_hand: 5 },
            { warehouse_id: "V2FyZWhvdXNlOjEyODg=" on_hand: 15 }
        ]
    }) {
        request_id
        complexity
        product {
            id
            name
            sku
            warehouse_products {
                id
            }
        }
    }
}
Note
For more examples on Queries and Mutations you can also visit: Examples
Throttling & Quotas
Opening an API to the public means many things can go wrong: some users might abuse it, and others may rely on trial and error. Given the dynamic nature of GraphQL, users are responsible for making the queries, and intentionally or not they can come up with extremely expensive queries. In order to prevent those from happening and affecting the entire performance of the API, some measures have to be taken. That’s why we have implemented rate limiting based on user quotas.
Each operation performed by the public API has a calculated complexity, representing the cost of executing that particular operation. Following this, users will start with an initial amount of 4004 credits, and every second, 60 credits are restored. How many operations you can execute will depend on how you build them. The same query can have a different complexity if you decide to fetch a lot of information from the results, or if you navigate across relationships to enrich the results. No operation can exceed 4004 credits.
Given the dynamic nature of GraphQL operations it might be hard to imagine the cost of an operation, so here’s where the analyze parameter available in queries becomes relevant. If you send analyze: true the query won’t be executed, but instead, only the complexity will be calculated. You can then retrieve the cost of that query by accessing the complexity field from the response.
The main concepts that make the throttling strategy are the following:
- Customers are given 4004 credits shared across all users.
- Every second, 60 credits are restored (this is the increment_rate).
- No operation can exceed 4004 credits.
Per account credit limits will be strictly enforced, so please keep this in mind when using the public API.
How we charge for credits
We analyze the query, compare the expected cost based on the number of results requested to the actual cost of the returned query, and credit you pool back with the difference.
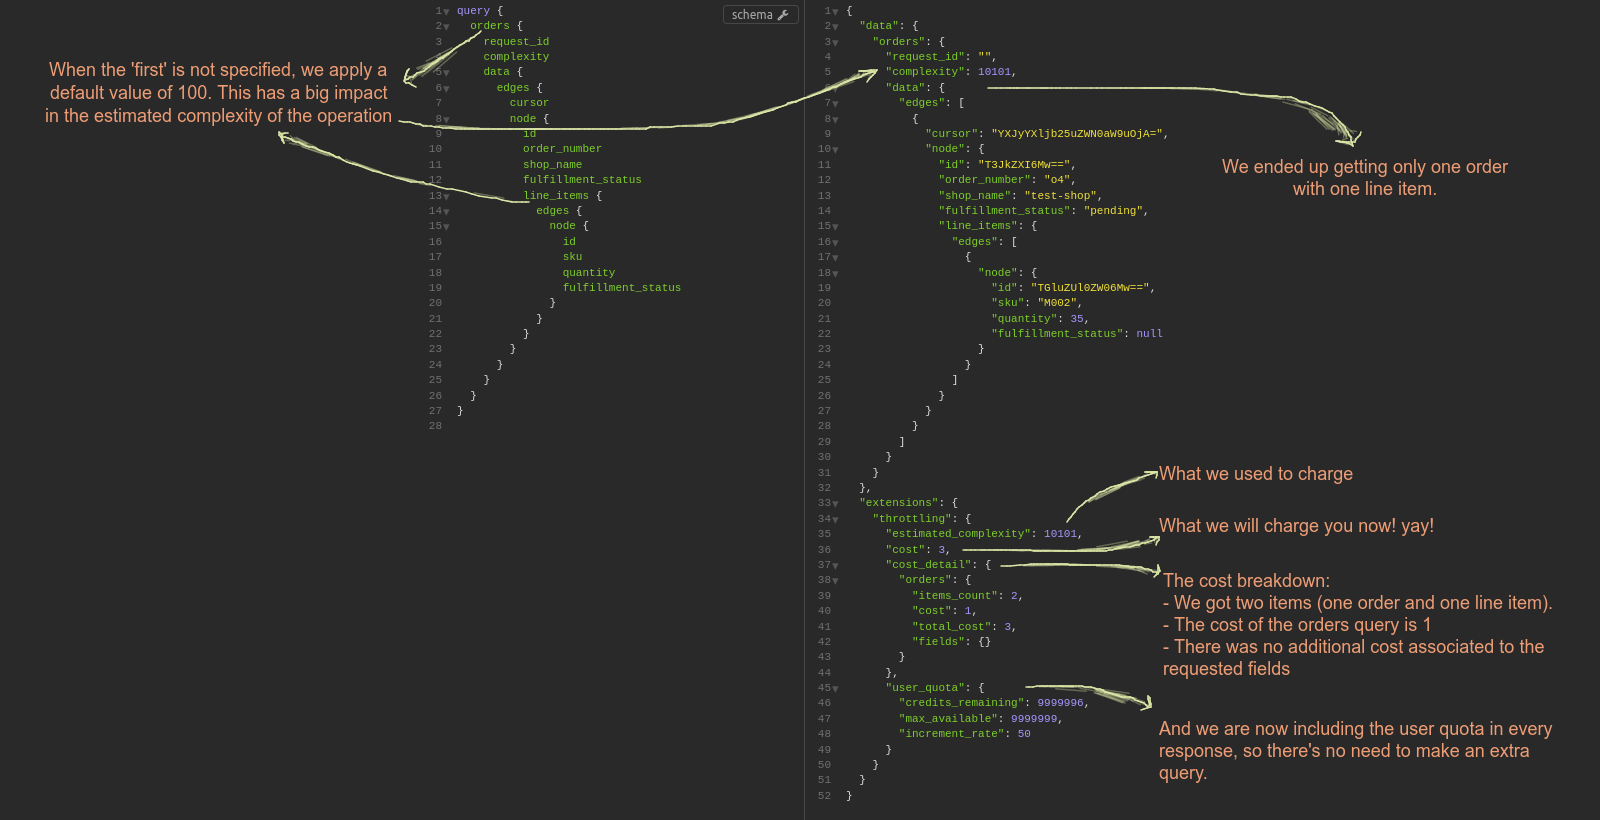
For every request, we calculate an estimated cost based on the operation requested. The estimation is greatly affected by the relay parameters used in connection fields. When no first value is defined, we always assume a default of 100.
You will be charged for what you get. If you asked for a 100 but got 5, we will only charge you those 5. Let’s see it with an example:
A common question has been:
How do we iterate order line items without asking for too much (thus producing a more expensive query) but not too little (having to make another query to get the remaining line items)
Well, no need to worry about that anymore. Just ask for what you think you should get. If you get less, you won’t be charged. This means you don’t need to worry too much about optimizing the first parameter. It’s better to ask for 50 and get 30 than asking for 25 and needing to make an extra query to fetch the remaining 5.
Note
Although we return credits not spent, we still require that calls don’t exceed the maximum allowed per account. This means that if your account has an upper limit of 4004 credits, the query structure should not require more than 4004 credits. You can use the analyze argument present in all our queries to check this before making the call.
Warning
Aside from the quota, ShipHero strictly enforces a policy of 7000 max requests during the last 5 minutes. Going over that threshold will trigger a “429 Too Many Requests” in your subsequent requests until you drop below it again.
This also includes requests that returned an error and IntrospectionQuery requests.
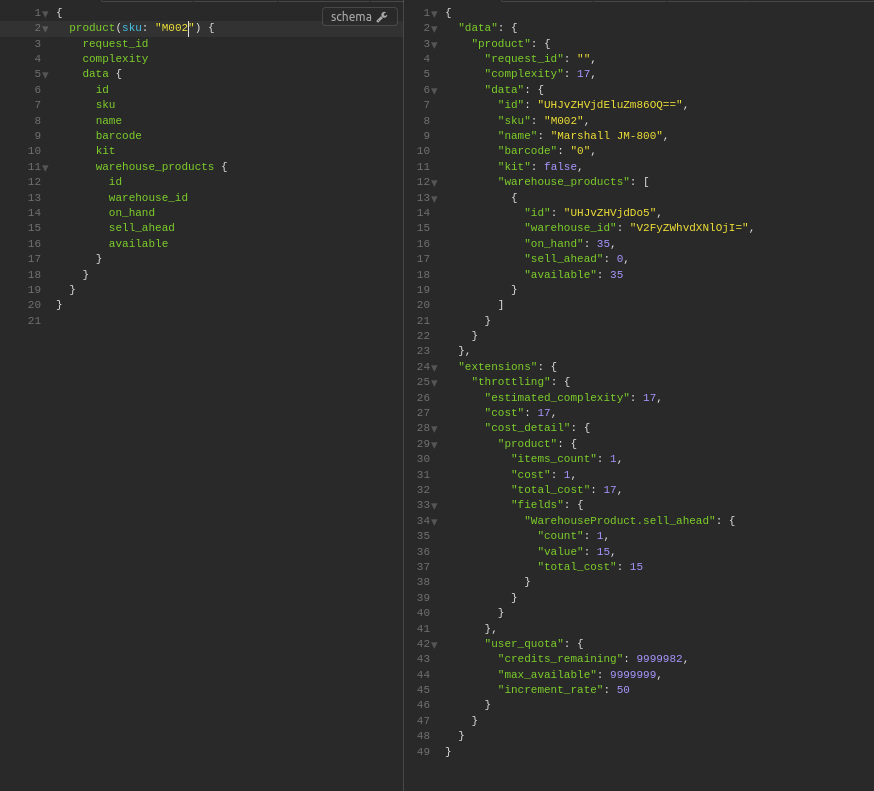
What about specific field costs?
Some of our schema fields have a cost associated with them. Now, whenever you request one of those fields, you will see the cost and the impact it has on the overall cost of your request.
Analyzing query
In this case, the result won’t include any products, the query won’t be executed, it will only be analyzed to calculate its complexity, giving the user the possibility to know beforehand how many credits it will consume.
query {
    products(analyze: true) {
        complexity
        request_id
        data(first: 10) {
            edges {
                node {
                    id
                    sku
                    name
                    warehouse_products {
                        id
                        warehouse_id
                        on_hand
                    }
                }
            }
        }
    }
}
and the output would look like this:
{
    "data": {
        "products": {
            "complexity": 101,
            "request_id": "5cea345gsn87a",
            "data": {
                "edges": []
            }
        }
    }
}
Throttling error
When you request an operation that exceeds your user quota you will receive an error like this one:
 {
  "errors": [
    {
      "code": 30,
      "message": "There are not enough credits to perform the requested operation, which requires 101 credits, but there are only 55 left. In 4 seconds you will have enough credits to perform the operation",
      "operation": "inventory_changes",
      "request_id": "5da7dc13f3079f0def208711",
      "required_credits": 101,
      "remaining_credits": 55,
      "time_remaining": "4 seconds"
    }
  ],
  "data": {
    "inventory_changes": null
  }
}
Note
A useful way to avoid throttling errors is to use the “time_remaining” value returned by a query or mutation and extract the number from it.
Then, by using some sort of wait() or sleep() call you could make the script wait until credits are restored back. If you do that, the credits essentially become limitless, and your query can run until you get all required results.
User Quotas
You get the status of your user quota in every response.
After a few operations, you might want to know how many credits you have available and for how long. That’s exactly what the user_quota query will provide you:
query{
  user_quota{
    credits_remaining
    max_available
    increment_rate
  }
}
Optimizing a Query
Usually, if a query has connections, it means that it will consume a large number of credits.
In these cases, best practice is to include the first or last argument, specifying the number of items you want to be returned (this is equivalent to limit).
By doing this, you’ll be able to optimize your Query and consume fewer credits.
For example, let’s suppose we use the Orders Query to get orders and it’s line_items, but we don’t include first or last on the connections.
The Query should be something like this:
query {
  orders {
    request_id
    complexity
    data {
      edges {
        node {
          id
          order_number
          line_items {
            edges {
              node {
                id
                sku
                quantity
                product_name
              }
            }
          }
        }
      }
    }
  }
}
And the response will be an error like this:
{
  "errors": [
    {
      "code": 30,
      "message": "There are not enough credits to perform the requested operation, which requires 10001 credits, but there are only 5000 credits left. You can execute queries up to that level of credits or wait 55 minutes until your quota is refreshed",
      "operation": "orders",
      "request_id": "5d654ee06c22facb34d95769",
      "required_credits": 10001,
      "remaining_credits": 1001,
      "time_remaining": "55 minutes"
    }
  ],
  "data": {
    "orders": null
  }
}
Which means we don’t have the necessary credits for this Query
Important
The reason is the following:
- The cost of a single operation is 1
- If we don’t include
FirstorLastit assumes a maximum quantity of 100ordersand 100line_itemseach order.
So total credits estimated are: 1 + 100*100 = 10001
Instead, if we narrow the Query down to the first 10 orders and its 10 line_items, the Query should look like this:
query {
  orders {
    request_id
    complexity
    data (first:10) {
      edges {
        node {
          id
          order_number
          line_items(first:10) {
            edges {
              node {
                id
                sku
                quantity
                product_name
              }
            }
          }
        }
      }
    }
  }
}
Which means that total credits estimated are: 1 + 10*10 = 101
Note
hasNextPage can be included on the Query under pageInfo field. This will help verify if more queries are needed to get the rest of the data.