Webhooks
In this section, we will explore all of the available webhooks, list some examples, and see how you can register and unregister webhooks.
- Register a Webhook
- Update a Webhook URL
- Enable a Webhook
- Disable a Webhook
- Un-register an existing webhook
- List all registered webhooks
- View Webhook Call Logs
- Request Verification
- Message Identification Header
ShipHero webhooks are designed to provide asynchronous notification when an event occurs. Webhooks should not be used for real-time or synchronous operations where an immediate response or guaranteed low latency is required.
Webhook Health
Important
Upcoming feature: The automatic webhook health monitoring described in this section will be activated on April 20, 2026. Please review the information below and ensure your webhook endpoints are prepared.
To protect the reliability of your integrations, ShipHero automatically monitors the health of each registered webhook. Every webhook has a health status that reflects the current state of its endpoint. You can check the current health status of any webhook at any time by using the webhooks query and reading the health field in the response.
The three possible health statuses are:
| Status | Description |
|---|---|
| HEALTHY | The webhook is active and receiving events normally. No action is required. |
| WARNING | The webhook is still active, but persistent errors have been detected. An email notification is sent to the account email associated with the webhook. |
| UNHEALTHY | The webhook has been automatically disabled due to continued failures. A final email notification is sent confirming the webhook has been disabled. |
The following diagram illustrates the health lifecycle and the transitions between each state:
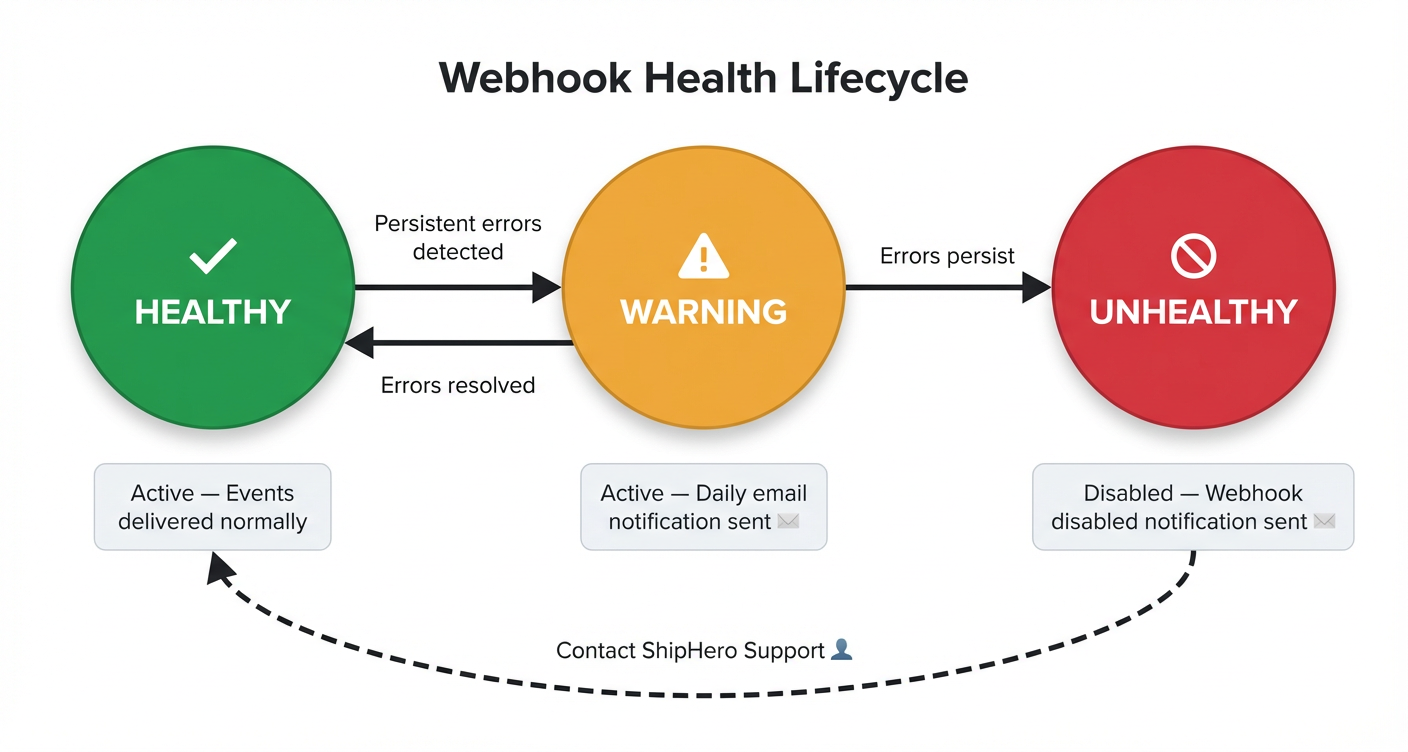
How it works
HEALTHY → WARNING: When your webhook endpoint returns persistent errors, the health status transitions to WARNING. An email notification is sent to alert you that the webhook is experiencing failures and needs attention. While in this state, the webhook remains active and continues to receive events. To avoid excessive notifications, only one email per day is sent for webhooks in WARNING status.
WARNING → HEALTHY: If you resolve the issues and your endpoint begins responding successfully, the health status automatically returns to HEALTHY.
WARNING → UNHEALTHY: If errors continue and are not resolved, the webhook transitions to UNHEALTHY. At this point, the webhook is automatically disabled and stops receiving events. A second email notification is sent to inform you that the webhook has been disabled.
Tip
If you receive a WARNING notification, we strongly recommend monitoring your webhook throughout the day to identify and fix the issue before it progresses to UNHEALTHY and the webhook is disabled.
Errors that affect webhook health
The following types of errors are tracked and contribute to health status transitions:
- SSL/TLS errors — Certificate issues preventing a secure connection.
- Connection errors — The endpoint is unreachable or refuses connections.
- Timeout errors — The endpoint does not respond within the allowed time (10 seconds; 20 seconds for Generate Label Webhook).
- Non-2xx HTTP status codes — Any response status code other than
2xxis treated as a failure.
Re-enabling an UNHEALTHY webhook
When a webhook reaches the UNHEALTHY state, it cannot be re-enabled using the webhook_enable mutation. To restore the webhook, please contact a ShipHero representative who can manually re-enable it after confirming that the underlying issues have been resolved.
Warning
Before requesting re-enablement, please ensure that your webhook endpoint is fully operational and all errors have been addressed. If the webhook continues to fail after re-enablement, it will follow the same health lifecycle and may be disabled again.
Best Practices
ShipHero does not guarantee a specific time-to-delivery (SLA) for webhook events. Delivery times can vary based on current system load, network conditions, and processing queues. Never use a webhook as the sole mechanism to confirm a time-sensitive step before proceeding with a user interface action. This can cause severe timeouts and a poor user experience.
For processes that require real-time status confirmation, use a dedicated, synchronous API endpoint or implement an asynchronous pattern where your application checks the status of the related resource (e.g., an order or shipment) via the standard ShipHero Public API, rather than relying on the webhook delivery itself.
ShipHero offers several webhooks you can subscribe to, and each one sends a different kind of information. For example, if you subscribe to the Inventory Update webhook, we send a webhook each time your inventory is updated.
Frequent Errors
Timeout
The most common cause of webhook failures is timeout. ShipHero enforces a 10-second timeout for all webhook calls (20 seconds for the Generate Label Webhook). Each individual webhook request must complete within this window, regardless of how many concurrent notifications your endpoint is receiving.
High-volume webhooks can generate hundreds of notifications per minute. If your endpoint performs synchronous operations — such as database writes, external API calls, or complex business logic — within the webhook handler itself, the processing time can easily exceed the timeout threshold, resulting in failures that affect your webhook’s health status.
Your webhook endpoint must be asynchronous. We strongly recommend the following approach:
- Receive the notification — Accept the incoming webhook request and immediately return a
2xxresponse. - Enqueue the payload — Place the webhook payload into a message queue or background job system for deferred processing.
- Process asynchronously — A separate worker or consumer processes the queued payloads at its own pace, without blocking the webhook endpoint.
Warning
Do not execute business logic inside your webhook handler. Performing actions such as API calls, order processing, or inventory updates within the webhook request body is the primary cause of timeout errors. Always delegate processing to a background queue.
Response
When we send a webhook, we wait for a response:
HEADERS: Content-Type:application/json
BODY:
{
  "code": "200",
  "Status": "Success"
}
The response timeout is 10 seconds, with 5 retries per trigger.
Webhook Deactivation Policy: If a webhook persistently fails to respond successfully, even after repeated retries, we reserve the right to deactivate it following a review to protect the integrity and resources of our system.
Warning
The Generate Label webhook is the only one with a 20-second timeout.
Note
Although it is not often, it is possible for a webhook not to fire, and that is why your app should not rely just on receiving data from our webhooks.
The webhook delivery is not always guaranteed, so we strongly suggest implementing reconciliation jobs to periodically fetch data from ShipHero.
Our most important Queries have both the created_at_min and updated_at_min filter parameters, which will allow you to build a job that fetches all resources that have been created or updated since the last time the job ran.
Available webhooks
To be able to register a new webhook you will need to use the webhook_create mutation.
If you want to update an existing webhook’s URL, you can use the webhook_update_url mutation.
- Inventory Update
- Inventory Change
- Shipment Update
- Automation Rules
- Order Canceled
- Capture Payment
- PO Update
- Return Update
- Tote Complete
- Tote Cleared
- Order Packed Out
- Package Added
- Print Barcode
- Order Allocated
- Order Deallocated
- Shipment ASN
- Work Order Status Update
- Generate Label Webhook
Register a Webhook
The mutation to register a webhook could be:
mutation {
  webhook_create(
    data: {
      name: "Inventory Update"
      url: "https://someURL.x.webhook.net"
      shop_name: "api"
    }
  ) {
    request_id
    complexity
    webhook {
      id
      name
      url
      shop_name
      enabled
      health
      created_at
      updated_at
      last_enabled_change
      shared_signature_secret
    }
  }
}
The field name is the webhook type you want to register to, for example, Inventory Update. Use the name as written in the list above, respecting spaces and capitals.
The field shop_name is an identifier that doesn’t necessarily need to be the shop’s name. If you have more than one endpoint you need the same webhook sent to, using a different Shop Name will allow you to register a second webhook of the same type.
Creating a webhook in disabled state
By default, webhooks are created in an enabled state and will immediately start receiving events. If you need to create a webhook but want to configure your endpoint first before receiving events, you can create it in a disabled state by setting enabled: false.
Note
When creating a webhook, ShipHero sends a HEAD request to the provided URL to validate that the endpoint is reachable. This validation occurs regardless of whether the webhook is created in an enabled or disabled state. Ensure your endpoint is accessible and responds successfully to HEAD requests before registering the webhook.
mutation {
  webhook_create(
    data: {
      name: "Inventory Update"
      url: "https://someURL.x.webhook.net"
      shop_name: "api"
      enabled: false
    }
  ) {
    request_id
    complexity
    webhook {
      id
      enabled
      shared_signature_secret
    }
  }
}
When you’re ready to start receiving events, you can enable the webhook.
Response fields
The response for it should be something like this:
{
  "data": {
    "webhook_create": {
      "request_id": "60dd12525e4d76b3ee093d7d",
      "complexity": 5,
      "webhook": {
        "id": "QXBpV2ViaG9vazoxNjE0ODc4",
        "name": "Inventory Update",
        "url": "https://someValidURL.net/",
        "shop_name": "api",
        "enabled": true,
        "health": "HEALTHY",
        "created_at": "2025-01-15T10:30:00Z",
        "updated_at": "2025-01-15T10:30:00Z",
        "last_enabled_change": "2025-01-15T10:30:00Z",
        "shared_signature_secret": "b0b588622fb191c3d96c34c5f929fbae04b94e74"
      }
    }
  }
}| Field | Description |
|---|---|
id | Unique identifier for the webhook |
name | The webhook type name |
url | The endpoint URL where events are sent |
shop_name | The shop name identifier |
enabled | Whether the webhook is currently active and receiving events |
health | Current health status of the webhook (e.g., “HEALTHY”, “WARNING”, “UNHEALTHY”) |
created_at | Timestamp when the webhook was created |
updated_at | Timestamp when the webhook was last updated |
last_enabled_change | Timestamp when the webhook was last enabled or disabled |
shared_signature_secret | Secret used for request verification (only shown on creation) |
The shared_signature_secret that you will get in return is the one you will be used to validate the webhook using the HTTP_X_SHIPHERO_HMAC_SHA256
shared_signature_secret will only display once, when first registering the webhook.
If you are using a 3PL account, webhooks need to be registered on the Customer account and not the 3PL account to trigger correctly.
Update a Webhook URL
If you need to change the destination URL of an existing webhook, use the webhook_update_url mutation. This allows you to point the webhook to a new endpoint without having to delete and recreate it, preserving the webhook’s configuration and shared_signature_secret.
mutation {
  webhook_update_url(
    data: {
      webhook_id: "QXBpV2ViaG9vazoxNjE0ODc4"
      url: "https://new-endpoint.example.com/webhook"
    }
  ) {
    request_id
    complexity
    webhook {
      id
      name
      url
      shop_name
      enabled
    }
  }
}| Parameter | Type | Required | Description |
|---|---|---|---|
webhook_id | String | Yes | The unique identifier of the webhook to update |
url | String | Yes | The new destination URL for the webhook |
The response will confirm the updated URL:
{
  "data": {
    "webhook_update_url": {
      "request_id": "60dd12525e4d76b3ee093d80",
      "complexity": 5,
      "webhook": {
        "id": "QXBpV2ViaG9vazoxNjE0ODc4",
        "name": "Inventory Update",
        "url": "https://new-endpoint.example.com/webhook",
        "shop_name": "api",
        "enabled": true
      }
    }
  }
}
Note
When updating the URL, ShipHero sends a HEAD request to the new URL to validate that the endpoint is reachable. Ensure your new endpoint is accessible and responds successfully to HEAD requests before updating.
Enable a Webhook
If you have a disabled webhook that you want to start receiving events, use the webhook_enable mutation:
mutation {
  webhook_enable(
    data: {
      webhook_id : "QXBpV2ViaG9vazoxNjE0ODc4"
    }
  ) {
    request_id
    complexity
    webhook {
      id
      name
      enabled
    }
  }
}
The response will confirm the webhook is now enabled:
{
  "data": {
    "webhook_enable": {
      "request_id": "60dd12525e4d76b3ee093d7e",
      "complexity": 5,
      "webhook": {
        "id": "QXBpV2ViaG9vazoxNjE0ODc4",
        "name": "Inventory Update",
        "enabled": true
      }
    }
  }
}
Once enabled, the webhook will start receiving events immediately.
Disable a Webhook
If you need to temporarily stop receiving events from a webhook without deleting it, use the webhook_disable mutation:
mutation {
  webhook_disable(
    data: {
      webhook_id : "QXBpV2ViaG9vazoxNjE0ODc4"
    }
  ) {
    request_id
    complexity
    webhook {
      id
      name
      enabled
    }
  }
}
The response will confirm the webhook is now disabled:
{
  "data": {
    "webhook_disable": {
      "request_id": "60dd12525e4d76b3ee093d7f",
      "complexity": 5,
      "webhook": {
        "id": "QXBpV2ViaG9vazoxNjE0ODc4",
        "name": "Inventory Update",
        "enabled": false
      }
    }
  }
}
Note
Disabling a webhook is useful when you need to perform maintenance on your endpoint or temporarily pause event processing. The webhook configuration is preserved, and you can re-enable it at any time.
Warning
When a webhook is disabled, all events that occur during the disabled period will be discarded and not delivered. These events are not queued or replayed when the webhook is re-enabled. If you need to recover data from the disabled period, use the ShipHero API to query for resources updated during that time using updated_at_min filters.
Un-register an existing webhook
To be able to un-register an existing webhook you will need to use the webhook_delete mutation, for example:
mutation {
  webhook_delete(data: {
    name: "PO Update",
    shop_name: "api" })
  {
    request_id
    complexity
  }
}
List all registered webhooks
If you need to get a list of all the webhooks you have registered to your account, you will have to use the webhooks query:
query {
  webhooks {
    request_id
    complexity
    data {
      edges {
        node {
          id
          legacy_id
          account_id
          shop_name
          name
          url
          source
          enabled
          health
          created_at
          updated_at
          last_enabled_change
        }
      }
    }
  }
}
And the response for it should be something like this:
{
  "data": {
    "webhooks": {
      "request_id": "5f04e1fcda845a0a76d4b102",
      "complexity": 101,
      "data": {
        "edges": [
          {
            "node": {
              "id": "QXBpV2ViaG9vazoxNjE0ODc4",
              "legacy_id": 1614878,
              "account_id": "QWNjb3VudDo2MzM0",
              "shop_name": null,
              "name": "Order Canceled",
              "url": "https://someURL.x.webhook.net",
              "source": "api",
              "enabled": true,
              "health": "HEALTHY",
              "created_at": "2025-01-10T08:00:00Z",
              "updated_at": "2025-01-15T12:30:00Z",
              "last_enabled_change": "2025-01-10T08:00:00Z"
            }
          },
          {
            "node": {
              "id": "QXBpV2ViaG9vazoxNjE0Nzky",
              "legacy_id": 1614792,
              "account_id": "QWNjb3VudDo2MzM0",
              "shop_name": null,
              "name": "PO Update",
              "url": "https://someURL.x.webhook.net",
              "source": "api",
              "enabled": false,
              "health": "UNHEALTHY",
              "created_at": "2025-01-08T14:20:00Z",
              "updated_at": "2025-01-14T09:15:00Z",
              "last_enabled_change": "2025-01-14T09:15:00Z"
            }
          },
          {
            "node": {
              "id": "QXBpV2ViaG9vazoxNjE1MDQy",
              "legacy_id": 1615042,
              "account_id": "QWNjb3VudDo2MzM0",
              "shop_name": null,
              "name": "Return Update",
              "url": "https://someURL.x.webhook.net",
              "source": "api",
              "enabled": true,
              "health": "HEALTHY",
              "created_at": "2025-01-12T16:45:00Z",
              "updated_at": "2025-01-12T16:45:00Z",
              "last_enabled_change": "2025-01-12T16:45:00Z"
            }
          }
        ]
      }
    }
  }
}
View Webhook Call Logs
After creating and enabling a webhook, use webhooks_call_logs to confirm that ShipHero is calling its endpoint. Start with the webhook id returned by webhook_create (or by the webhooks query), then query the recent call history. Each record shows the webhook type, destination URL, timestamp, HTTP status code, and response metadata, so you can determine whether the endpoint is receiving calls and responding successfully.
Note
This query returns call metadata only. It does not return the webhook payload, so it cannot be used to replay or replace webhook delivery.
The following example retrieves the first 10 calls during a one-hour period:
query WebhooksCallLogs(
  $webhook_id: String!
  $date_from: ISODateTime
  $date_to: ISODateTime
  $first: Int
  $after: String
) {
  webhooks_call_logs(
    webhook_id: $webhook_id
    date_from: $date_from
    date_to: $date_to
    first: $first
    after: $after
  ) {
    request_id
    complexity
    data {
      page_info {
        has_next_page
        has_previous_page
        start_cursor
        end_cursor
      }
      edges {
        cursor
        node {
          id
          webhook_type
          url
          timestamp
          status_code
          response
        }
      }
    }
  }
}
{
"webhook_id": "QXBpV2ViaG9vazoxMjM0NTY=",
"date_from": "2026-07-07T12:00:00Z",
"date_to": "2026-07-07T13:00:00Z",
"first": 10
}webhook_id is required and must be the encoded webhook ID. All dates are UTC. If date_to is omitted, the current UTC time is used. If date_from is omitted, it defaults to one hour before date_to. A query can cover at most seven days. first defaults to 10 and cannot exceed 100.
The results use cursor pagination. When page_info.has_next_page is true, pass page_info.end_cursor as the next request’s after value to retrieve the following page.
The view:webhooks scope is required. 3PL providers can retrieve logs for their own webhooks and for webhooks belonging to their child accounts. Requesting a webhook that belongs to another account returns an error.
Request Verification
Webhooks data sent from ShipHero will need to be verified with the secret found within the API section of the Settings area.
Each Webhook request includes a x-shiphero-hmac-sha256 header which is generated using the app’s shared secret, along with the data sent in the request.
Note
The Generate Label Webhook uses the “default” API Secret unless the order’s shop name matches an entry in the API Secrets list. For 3PL child relationships, the system always uses the 3PL’s secret, even when use_customer_shipping_account is enabled.
If a child customer has a direct relationship with the API Carrier and 3PL secret protection is required, shop-specific secrets can be created for each child customer. This allows sharing only the relevant credentials while keeping the default 3PL secret private.
You can retrieve all your API secrets from this link. If the default secret is missing or has been replaced, you can generate a new one and name it accordingly.
To verify that the request came from ShipHero, compute the HMAC digest according to the following algorithm and compare it to the value in the x-shiphero-hmac-sha256 header.
If they match, you can be sure that the Webhook was sent from ShipHero and the data has not been compromised.
Note that if you are using a Rack-based framework such as Ruby on Rails or Sinatra the header you are looking for is HTTP_X_SHIPHERO_HMAC_SHA256
Below is a simple example in Python, showing how one might verify a webhook request.
import hmac
import hashlib
import base64
from typing import Union


def verify_webhook_hmac(
    secret: Union[str, bytes],
    data: Union[str, bytes],
    hmac_signature: Union[str, bytes],
) -> bool:
    """
    Verifies the authenticity of a webhook request by comparing the incoming
    signature with a locally generated one.

    Args:
        secret: The shared secret key used for signing
        data: The request payload to verify
        hmac_signature: The signature received in the request header

    Returns:
        bool: True if the signature is valid, False otherwise
    """
    # Convert secret to bytes if it's a string
    if isinstance(secret, str):
        secret = secret.encode('utf-8')

    # Convert data to bytes if it's a string
    if isinstance(data, str):
        data = data.encode('utf-8')

    # Generate the HMAC signature
    digest = hmac.new(secret, msg=data, digestmod=hashlib.sha256).digest()
    calculated_signature = base64.b64encode(digest)

    # Use constant-time comparison to prevent timing attacks
    return hmac.compare_digest(calculated_signature, hmac_signature)
Message Identification Header
X-Shiphero-Message-ID
Type: string
Required: Always present
This header contains the unique message identifier, guaranteed to be unique within the process that triggered it.
Use Cases
Message Deduplication: Use this identifier to prevent processing the same message multiple times. Store this ID in your processing log or database to detect and skip duplicate processing attempts.
Distributed Tracing: Track a message’s journey through your system by logging this identifier at various processing stages.
Debugging: Reference this ID when investigating issues.